
Published: March 4, 2026
Author: SEO Free Genius Team
Reading time: 8 minutes
Introduction
Have you ever published a blog post or updated an important page, only to find weeks later that it still doesn’t appear in Google search results? You’re not alone. Thousands of website owners struggle with indexing problems every day, watching their valuable content remain invisible to potential visitors.
The frustration intensifies when you open Google Search Console and see messages like “Discovered – currently not indexed” or “Crawled – currently not indexed” next to dozens of your URLs. Resources such as Ahrefs’ guide on how to fix the “Discovered – currently not indexed” issue (Ahrefs) and Onely’s detailed walkthrough for resolving the same status in Google Search Console (Onely) show just how common this problem is. You’ve done the work to create quality content, but it can still feel like Google is ignoring it.
The good news is that most indexing problems have clear causes and practical solutions. In this comprehensive guide, you’ll learn a proven step-by-step method using free tools from SEOFreeGenius to diagnose and fix indexing issues. Whether you’re dealing with a brand-new website or trying to get existing pages indexed faster, this workflow will help you understand exactly what’s blocking your pages and how to resolve it using tools like the XML Sitemap Generator and guides from our SEO blog. By the end of this article, you’ll know how to audit your pages for technical blocks, generate clean XML sitemaps, submit them properly to Google, and track your indexing progress over time—all without spending a dollar on premium tools.
How Google Crawling and Indexing Actually Work
Before we dive into solutions, it’s essential to understand the three-stage process Google uses to discover and rank content: crawling, rendering, and indexing.
Crawling is when Googlebot (Google’s web crawler) visits your pages by following links from other websites or URLs listed in your sitemap. Think of it as a spider traveling across the web, discovering new content and checking existing pages for updates.
Rendering happens after crawling, where Google processes your page’s HTML, CSS, and JavaScript to understand what users will actually see. Modern websites often use JavaScript frameworks, so Google must fully render the page to extract all content and links.
Indexing is the final stage where Google analyzes your content, categorizes it, and stores it in its massive database. Only indexed pages can appear in search results for relevant queries. Learn more about how Google finds and ranks pages. It’s crucial to understand that not every crawled page gets indexed. Google actively filters out pages based on quality signals, duplicate content detection, technical issues, and resource constraints. A page showing “Discovered – currently not indexed” means Google found the URL but decided not to add it to the index yet, often due to quality concerns or low site authority.
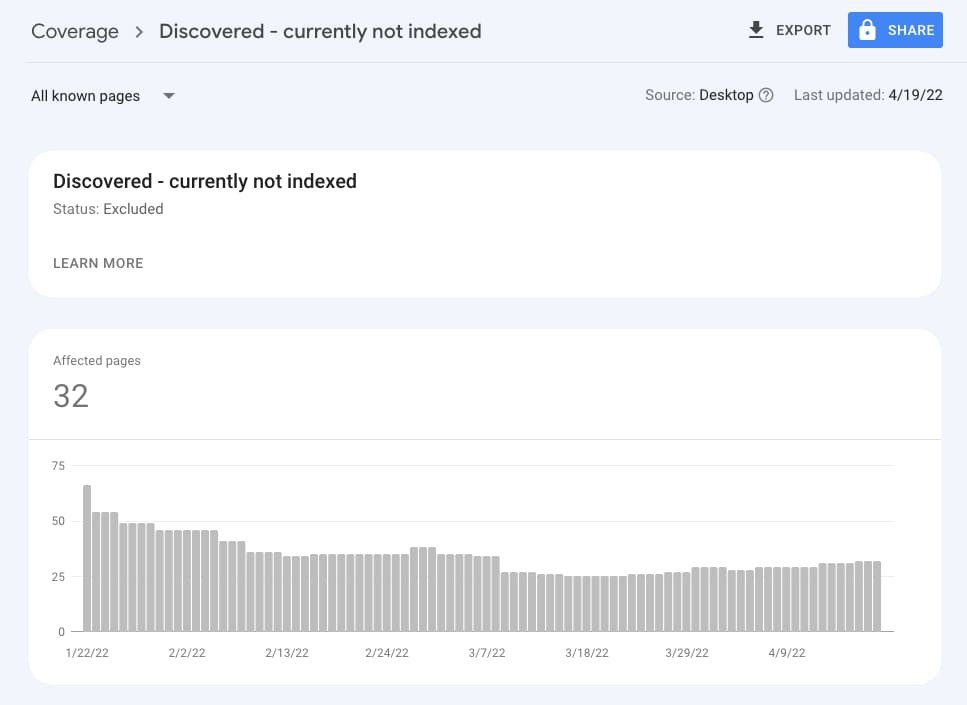
Figure 1: Google Search Console showing “Discovered – currently not indexed” status for multiple URLs
The difference between “Crawled – currently not indexed” and “Not found (404)” is significant. The former means Google successfully accessed your page but chose not to index it, while the latter indicates a broken URL that returns an error.
Common Reasons Your Pages Are Not Indexed
Understanding why pages fail to get indexed is the first step toward fixing the problem. Let’s examine the most common causes.
Technical barriers are often the easiest to identify and fix, yet they’re responsible for many indexing failures.
Robots.txt blocking: Your robots.txt file (located at yoursite.com/robots.txt) tells search engines which parts of your site they can crawl. If you’ve accidentally blocked important sections, Google cannot access those pages.
Noindex meta tags: A <meta name=”robots” content=”noindex”> tag explicitly tells Google not to index a page. This is sometimes added accidentally during development or by plugins. You can check for this using the Meta Tags Analyzer.
Wrong canonical tags: Canonical tags tell Google which version of a page is the “master” copy. If you point a page’s canonical tag to a different URL, Google will not index the current page—it will only index the canonical version.
Server errors and slow response times: If your server frequently returns 5xx errors or takes too long to respond, Google’s crawlers may abandon the attempt and move on. Monitor your uptime with a Server Status Checker.
Since 2024, Google has significantly tightened its quality filters, especially with the March 2024 core and spam updates that target scaled, low‑quality content and abuse of automation, documented in their updated spam policies and announcement on tackling spammy, low‑quality content. Pages perceived as low‑quality or duplicative often remain in “discovered” status indefinitely.
Thin content: Pages with very little unique text (typically under 300 words) or content that doesn’t provide substantial value beyond what already exists elsewhere are frequently not indexed.
Duplicate or near-duplicate content: If your page closely resembles another page on your site or elsewhere on the web, Google may choose to index only the original version.
AI-generated or spun content: In 2025 and 2026, Google implemented aggressive filters against low-effort AI content and article spinning. Sites heavily relying on such content without human expertise saw massive deindexing.
Crawl Budget and Internal Linking Problems
Every website has a crawl budget—the number of pages Google is willing to crawl within a given timeframe. Smaller or newer sites have limited crawl budgets, so Google prioritizes important pages.
Poor internal linking structure: Pages buried deep in your site structure (requiring many clicks from the homepage) or orphaned pages with no internal links pointing to them are less likely to be crawled and indexed. Analyze your link structure with the Link Analyzer tool.
Wasted crawl budget on low-value URLs: If Google spends time crawling parameter URLs, tag pages, search result pages, or other low-value URLs, it may not have budget left for your important content.
Low site authority: New websites or sites with minimal backlinks simply don’t get crawled as frequently as established, authoritative sites. This improves naturally over time as you build quality content and earn backlinks.
Step 1: Audit Your Page With Meta Tags Analyzer
Before generating a sitemap or requesting indexing, you must ensure that each page is technically ready to be indexed. The first diagnostic tool in your arsenal is the Meta Tags Analyzer from SEOFreeGenius.
Navigate to seofreegenius.com/meta-tags-analyzer and enter the URL of a page that’s not getting indexed.
The tool will extract and display all critical meta tags, including:
- Title tag (should be 50–60 characters, include target keyword)
- Meta description (should be 150–160 characters, compelling summary)
- Robots meta tag (must NOT contain “noindex”)
- Canonical tag (should point to itself or intentionally to another URL)
- Open Graph tags (og:title, og:description, og:image for social sharing)
Red flags to watch for:
- Robots tag shows “noindex” → This explicitly blocks indexing. Remove the noindex directive from your page’s HTML or CMS settings.
- Canonical points elsewhere → If the canonical URL is different from the page you’re trying to index, Google will index the canonical version instead.
- Missing or duplicate title/description → While not blocking indexing, these hurt your chances of ranking and getting clicks. Write unique, descriptive titles for every page. Learn more in our Meta Tags Masterclass.
- Empty or generic Open Graph tags → Not a blocking issue, but optimizing these improves social shares and user trust signals.
Action checklist after analysis:
- Fix any noindex tags immediately by editing your page’s HTML or CMS settings
- Correct canonical tags to point to the intended URL
- Write compelling, unique titles (50–60 characters) with your target keyword near the beginning
- Craft descriptive meta descriptions (150–160 characters) that encourage clicks
- Re-run the Meta Tags Analyzer to confirm all changes were saved properly
Step 2: Generate a Clean XML Sitemap
An XML sitemap is a file that lists all the important URLs on your website, helping search engines discover and prioritize your content. While sitemaps don’t guarantee indexing, they significantly improve crawl efficiency, especially for new or large sites.
Sitemaps are particularly valuable when:
- Your site is new and has few external backlinks
- Your site has many pages that aren’t well-linked internally
- You frequently publish new content or make significant updates
- Your site uses dynamic content or has complex architecture
- You have pages isolated in separate sections (like a blog subdomain)
Google explicitly recommends XML sitemaps for sites with more than a few dozen pages or weak internal linking.
How to Use XML Sitemap Generator
Visit seofreegenius.com/xml-sitemap-generator and follow these steps:
- Enter your website URL (homepage, e.g., https://example.com)
- Configure options if available:
- Change frequency: How often pages typically update (daily for news, weekly for blogs, monthly for static pages)
- Priority: Relative importance of pages (0.0 to 1.0, with homepage typically 1.0)
- Start the generation process – The tool will crawl your site and collect indexable URLs
- Review the generated sitemap to ensure it includes your most important pages
Download the XML sitemap file
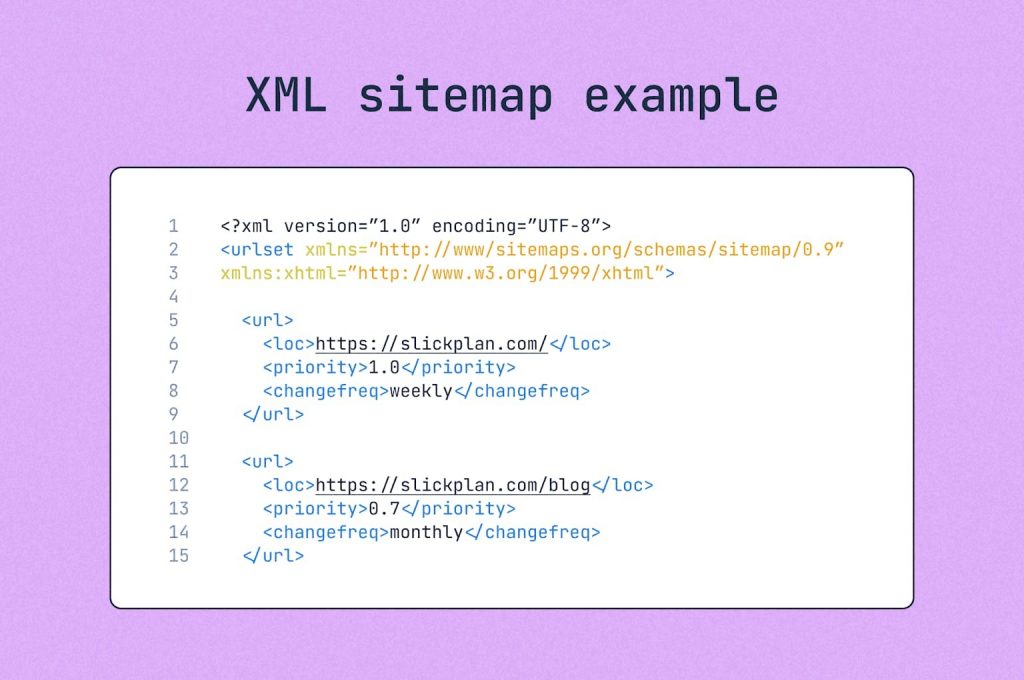
Figure 2: XML sitemap structure showing urlset, location, changefreq, and priority tags
To maximize effectiveness, follow these proven sitemap best practices:
Only include indexable pages: Your sitemap should contain only URLs you actually want Google to index. Exclude:
- Login pages, admin areas, and user account pages
- Tag pages, category archives, and search result pages (unless they offer unique value)
- Parameter URLs (e.g., ?utm_source=, ?page=2)
- Duplicate or near-duplicate content
- Pages with noindex tags
- Pages returning 404 or redirect status codes
Keep sitemaps under 50MB and 50,000 URLs: If your site is larger, create multiple sitemaps and a sitemap index file that lists them all.
Use absolute URLs: Always use full URLs including https:// and the complete domain name.
Update your sitemap regularly: Regenerate and resubmit whenever you add significant new sections or make major structural changes.
Include lastmod dates: The <lastmod> tag tells Google when a page was last updated, helping prioritize fresh content.
After downloading the XML file, upload it to your website’s root directory, making it accessible at:
https://yoursite.com/sitemap.xml Most website builders and content management systems (WordPress, Wix, Shopify) have built-in options to upload files to the root directory. Alternatively, use FTP or your hosting control panel’s file manager.
Step 3: Submit Sitemap and Inspect URLs in Search Console
Once your sitemap is live on your server, you must notify Google about it through Google Search Console.
- Log in to Google Search Console
- Select your property (website)
- Navigate to Sitemaps in the left menu
- Enter your sitemap URL (typically “sitemap.xml”) in the “Add a new sitemap” field
- Click Submit
Google will begin processing your sitemap. This doesn’t mean instant indexing—it means Google now knows about these URLs and will crawl them based on priority and available resources.
Use URL Inspection to Test Individual Pages
For pages that are particularly important or problematic, use the URL Inspection tool:
- Click URL Inspection in the left menu
- Enter the exact URL you want to check
- Google will show whether the URL is currently indexed
Possible results:
- “URL is on Google” → The page is successfully indexed and can appear in search results.
- “URL is not on Google” → The page is not indexed. Click “Test live URL” to see if Google can currently access it.
- “Discovered – currently not indexed” → Google found the URL but hasn’t indexed it yet, usually due to quality or crawl budget constraints.
- “Crawled – currently not indexed” → Google crawled the page but decided not to index it, often due to quality issues.
For pages showing “not indexed” but passing the live test, you can click “Request Indexing” to add them to Google’s priority crawl queue. However, if underlying quality or technical issues exist, this may not help.
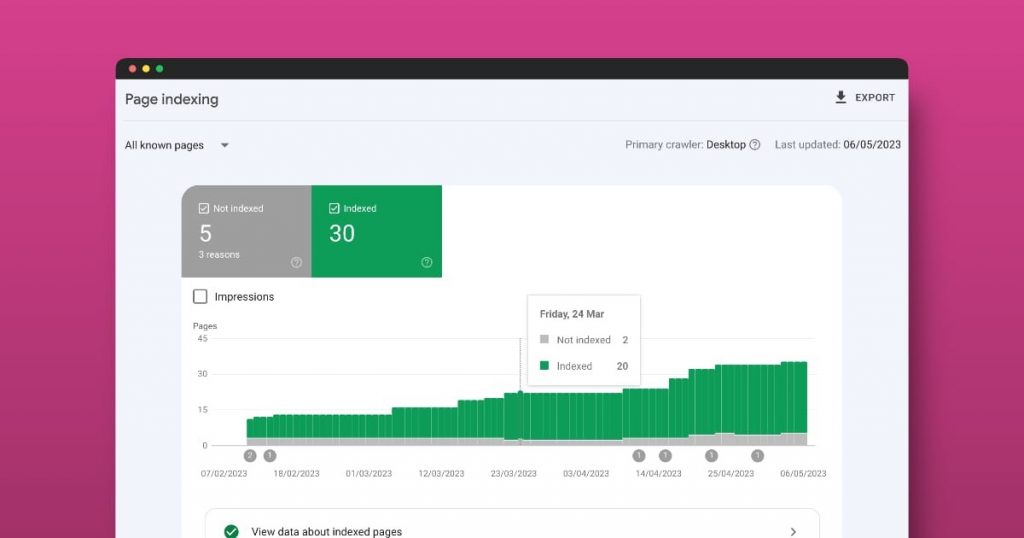
Figure 3: Google Search Console Page Indexing report showing indexed vs excluded pages over time
Interpret Coverage and Page Indexing Reports
Navigate to Pages (or Coverage in older Search Console versions) to see an overview of your entire site’s indexing status.
This report categorizes URLs into:
- Indexed: Pages successfully in Google’s index
- Not indexed: Pages excluded for various reasons (click to see specific error types)
- Valid with warnings: Pages indexed but with minor issues
Review the “Not indexed” section carefully. Common reasons include:
- Discovered – currently not indexed (crawl budget or quality)
- Crawled – currently not indexed (quality issues)
- Duplicate, Google chose different canonical
- Page with redirect
- Soft 404 (page looks empty to Google)
- Blocked by robots.txt
- Excluded by noindex tag
Each reason requires a different fix, but the Meta Tags Analyzer and sitemap steps you’ve already completed address most technical causes.
Step 4: Track Indexing Over Time With Google Index Checker
After submitting your sitemap and making technical fixes, you need to monitor indexing progress consistently. The Google Index Checker at seofreegenius.com/google-index-checker allows you to quickly verify whether specific URLs are indexed.
How to Use Google Index Checker
- Visit the tool page
- Enter the exact URL you want to check (one at a time)
- Click Submit
- The tool queries Google and reports whether the page currently appears in the index
Results interpretation:
- Indexed: The page is in Google’s index and can potentially rank for queries.
- Not indexed: Google has not stored this URL in its search index yet.
Create a Simple Tracking System
For sites with multiple important pages, create a spreadsheet to track indexing status over time:
| URL | Date Submitted | Initial Status | Current Status | Notes |
| example.com/guide-1 | March 1 | Not indexed | Indexed (March 10) | Improved content |
| example.com/tool-page | March 1 | Not indexed | Not indexed | Low word count |
| example.com/blog-post | March 5 | Not indexed | Indexed (March 8) | Fast indexing |
Table 1: Sample indexing tracking spreadsheet
Check each URL weekly using the Google Index Checker and update your spreadsheet. This helps identify patterns—for example, which types of pages get indexed fastest, or whether particular sections of your site consistently struggle with indexing.
Indexing is not instant. Typical timeframes are:
- High-authority sites with strong backlinks: Hours to a few days
- Established sites with moderate authority: 3–7 days
- New sites with low authority: 1–4 weeks (sometimes longer)
- Pages on sites with quality issues: Weeks to months, or never
Be patient, but if a page remains unindexed after 3–4 weeks despite passing all technical checks, it likely has a content quality issue.
When to Improve Content vs Use Noindex
Not every page deserves to be indexed. Strategic use of the noindex directive can actually improve your site’s overall indexing by focusing Google’s attention on your best content.
Consider improving and keeping a page indexable if:
- It receives organic traffic (even minimal)
- It has external backlinks pointing to it
- It serves a clear user need that isn’t met by other pages on your site
- It can realistically be expanded to 500+ words with unique, valuable content
- It targets a distinct keyword or topic
How to improve thin content:
- Research user intent behind the topic—what questions do people have?
- Add sections answering common questions (create an FAQ section)
- Include concrete examples, case studies, or step-by-step instructions
- Add relevant images, diagrams, or screenshots with descriptive alt text
- Link to and from related articles on your site to build topical clusters
- Ensure the page has a clear, compelling title and meta description
Criteria for Noindex or Removal
Use noindex or consider merging/deleting pages that:
- Have zero traffic and zero backlinks for 6+ months
- Are extremely thin (under 200 words) with no potential to expand
- Duplicate or closely overlap with other pages on your site
- Serve purely administrative or template functions
- Are parameter-based or filtered views of other content
Example scenario: You have 50 old blog posts, each under 300 words, with no traffic and no backlinks. Google is wasting crawl budget trying to process them, potentially slowing down indexing of your newer, better content. Solution: Either expand the best 10–15 into comprehensive guides and noindex/delete the rest, or merge related posts into single, stronger articles.
To add noindex to a page, insert this meta tag in the <head> section: The follow part tells Google to still follow links on the page, preserving internal link equity even though the page itself won’t be indexed.
A Simple Indexing Checklist You Can Reuse
Use this checklist every time you publish new content or troubleshoot indexing issues:
Pre-publication technical checks:
- Page has a unique, descriptive title (50–60 characters) with target keyword
- Meta description is compelling and 150–160 characters
- URL is clean and readable (no random parameters)
- Page has at least 500–800 words of unique, valuable content
- Images have descriptive alt text
- Page includes 3–5 relevant internal links to related content
- No noindex tag is present (unless intentional)
- Canonical tag points to itself or is absent
Post-publication indexing workflow:
- Run URL through Meta Tags Analyzer to verify all tags are correct
- Ensure the URL is included in your XML sitemap (regenerate if needed using XML Sitemap Generator)
- Resubmit sitemap in Google Search Console if you regenerated it
- Use URL Inspection in Search Console to check initial status
- If eligible, click “Request Indexing” to add to priority queue
- Check indexing status after 7–10 days using Google Index Checker
- If still not indexed after 3–4 weeks, revisit content quality and internal linking
Monthly site-wide audit:
- Review Pages report in Search Console for new “not indexed” issues
- Regenerate and resubmit XML sitemap if site structure changed significantly
- Identify and fix any new technical blocks (404s, server errors, robots.txt issues)
- Improve or noindex persistently unindexed pages with zero value
- Add internal links from high-authority pages to important new content
Conclusion
Indexing problems can feel like a frustrating black box, but with the right diagnostic tools and systematic approach, they become manageable and fixable. By auditing your pages with the Meta Tags Analyzer, generating clean XML sitemaps, properly submitting them to Google Search Console, and tracking progress with the Google Index Checker, you can take control of how search engines discover and index your content.
Remember that indexing is not instantaneous, especially for newer sites. Focus on creating genuinely valuable content, fixing technical barriers, and building a strong internal linking structure. Over time, as your site gains authority and trust signals, indexing will become faster and more reliable.
The free tools at SEOFreeGenius give you everything you need to diagnose and solve indexing issues without expensive enterprise software. Bookmark this guide and return to it whenever you face indexing challenges—the workflow remains consistent and effective.
Start by auditing your most important unindexed pages today. Fix the technical issues, improve the content where needed, and submit a fresh sitemap. Within a few weeks, you should see measurable improvement in your indexed pages count. For more in-depth SEO guides and free tools, visit seofreegenius.com/blog and explore the complete toolkit at seofreegenius.com.
Samir H. M. — SEO Expert
5+ years building SEO tools. SEOFreeGenius creator—50+ sites to #1.
All Articles →
Samir H. M. is the creator of [seofreegenius.com], offering 66+ free SEO tools from Riyadh. He’s hands-on tested and built features like plagiarism checkers and backlink tools, plus 36 guides to help sites rank better. Practical, no-BS advice for real users.