
Published: March 9, 2026
Author: SEO Free Genius Team
Reading time: 20 minutes
Introduction
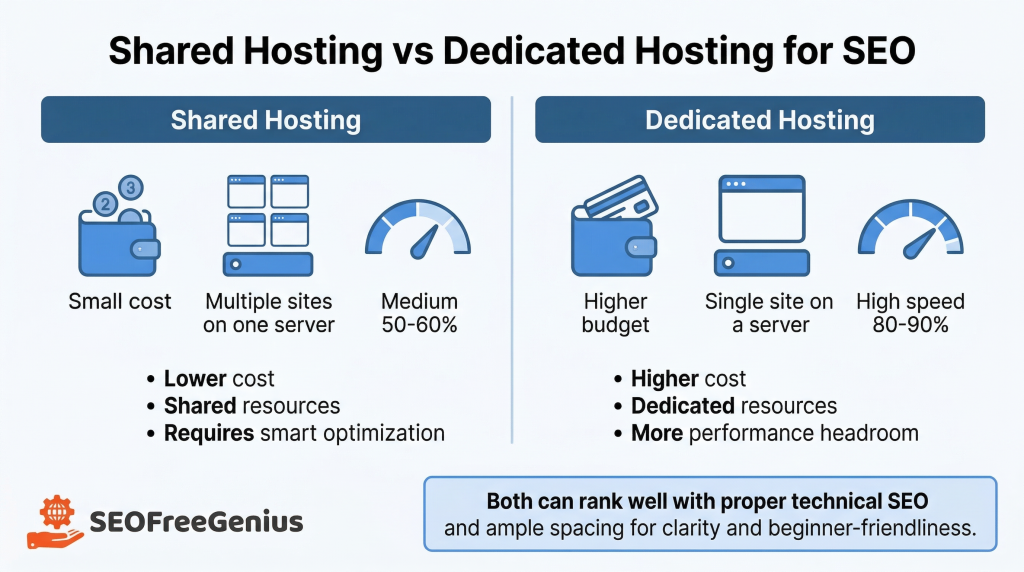
If you’re running a website on shared hosting, you’ve probably heard the warnings: “Shared hosting is too slow for SEO,” or “You’ll never rank well without expensive dedicated servers.” These myths stop thousands of website owners from even trying to compete—but they’re simply not true.
The reality: You absolutely can achieve strong search rankings on shared hosting. While it’s true that shared hosting has limitations (you’re sharing server resources with dozens or hundreds of other sites), Google doesn’t penalize your site just because you’re on a budget host. According to former Google Search Quality team member Matt Cutts, hosting type itself is not a ranking factor because “you can’t control who else shares your IP address.”
What does matter for SEO on shared hosting is how well you optimize for:
- Site speed and performance (Core Web Vitals)
- Server reliability and uptime
- Crawl efficiency (helping Google discover and index your pages quickly)
- Clean URL structures and redirects
- Proper technical configurations
The good news: All of these are completely achievable on shared hosting with the right strategies and free tools—no developer required, no expensive subscriptions. In this guide, you’ll learn exactly how to monitor your server health, reduce page weight, fix redirect chains, optimize your sitemaps, and make your budget site fast and crawlable. By the end, you’ll have a concrete action plan that levels the playing field between your $5/month hosting and sites on premium infrastructure.
Why Technical SEO Matters Even More on Shared Hosting
On dedicated or VPS hosting, you have abundant resources: lots of CPU power, plenty of memory, and fast disk I/O. Your site can tolerate some inefficiencies and still perform well.
On shared hosting, every inefficiency is magnified. You’re competing for limited resources with other sites on the same server, which means:
- Slow page loads hurt more: If your site takes 5+ seconds to load, Google’s crawler may reduce how often it visits your site (called “crawl budget”), and users will bounce before your content even appears.
- Downtime is more damaging: If your server goes offline frequently due to overselling or resource contention, Google sees these errors and may temporarily de-prioritize your pages in search results.
- Redirect chains waste resources: Every extra redirect adds 100–300ms to page load time and wastes precious crawl budget—resources you can’t afford to waste on shared hosting.
According to research cited in the SEO Free Genius guide to maximizing site speed on shared hosting, even a one-second delay in page load time can reduce conversions by 7%, and slow servers cause Google to back off crawling, leaving updated content undiscovered.
But here’s the encouraging part: Technical SEO best practices on shared hosting often deliver bigger ranking improvements than on premium hosting, precisely because you’re starting from a lower baseline. Fixing inefficiencies that would barely register on a powerful server can produce dramatic speed gains on shared hosting. The key is to work smarter, not harder—and to leverage free tools that automate the monitoring and diagnosis work.
Step 1: Monitor Your Server Uptime and Response Codes
The first technical SEO priority on shared hosting is ensuring your site is actually online and accessible when Google tries to crawl it.
Why Uptime Monitoring Matters
Shared hosting providers sometimes oversell their servers, cramming hundreds of accounts onto hardware designed for far fewer sites. When multiple sites on your server experience traffic spikes simultaneously, the server can become overloaded, resulting in:
- Slow response times (2+ seconds to first byte)
- Intermittent 503 “Service Unavailable” errors
- Complete downtime during peak resource contention
Google’s crawler is patient but not infinitely so. If Googlebot encounters repeated errors or timeouts when trying to access your site, it will reduce how often it crawls you—meaning your new content takes longer to appear in search results, and ranking updates lag behind competitors.
According to industry research on shared hosting SEO, consistent uptime above 99.9% and page load speeds under three seconds are critical for maintaining search rankings on shared hosting.
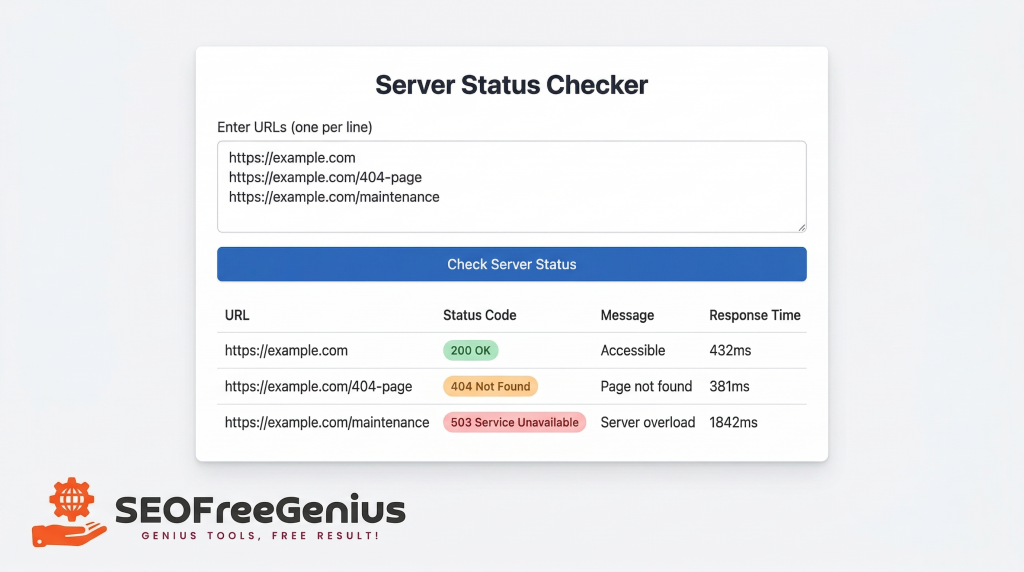
How to Monitor Uptime for Free
You don’t need expensive enterprise monitoring services. Start with the Server Status Checker on SEO Free Genius.
Here’s how to use it:
- Go to the Server Status Checker tool at https://seofreegenius.com/server-status-checker
- Enter your homepage URL and 3–5 important inner pages (your most valuable content)
- Click Submit to test each URL
The tool returns HTTP status codes for each page:
- 200 OK: Page is accessible and loading correctly ✅
- 404 Not Found: Page doesn’t exist (fix broken links)
- 500 Internal Server Error: Server-side problem (contact hosting support)
- 503 Service Unavailable: Server is overloaded or temporarily down (bad sign for shared hosting quality)
What to do with the results:
- If you see frequent 500 or 503 errors: Your hosting provider may be overselling resources. Document these errors (take screenshots with timestamps) and contact support. If the problem persists, consider switching to a more reputable shared hosting provider that invests in proper infrastructure.
- If pages return 404 errors: These are broken links that waste crawl budget and frustrate users. Use the findings to create a fix list. The SEO Free Genius guide to fixing broken links explains exactly how to implement 301 redirects to repair these issues.
Pro tip: Set a calendar reminder to run this check weekly. Catching uptime problems early—before Google notices them—prevents ranking drops.
Understanding Response Time
The Server Status Checker also shows approximate response times. On shared hosting, aim for:
- Under 800ms response time = Excellent
- 800ms–1.5 seconds = Acceptable
- Over 1.5 seconds = Needs optimization
If your response times are consistently slow, proceed to Step 2 to reduce page weight, which is often the biggest factor you can control on shared hosting.
Step 2: Measure and Reduce Page Size for Faster Loading
Page weight; the total size of your HTML, CSS, JavaScript, images, and other assets; directly affects load time. On shared hosting, where server processing power is limited, every extra kilobyte matters.
Why Page Size Is Critical on Shared Hosting
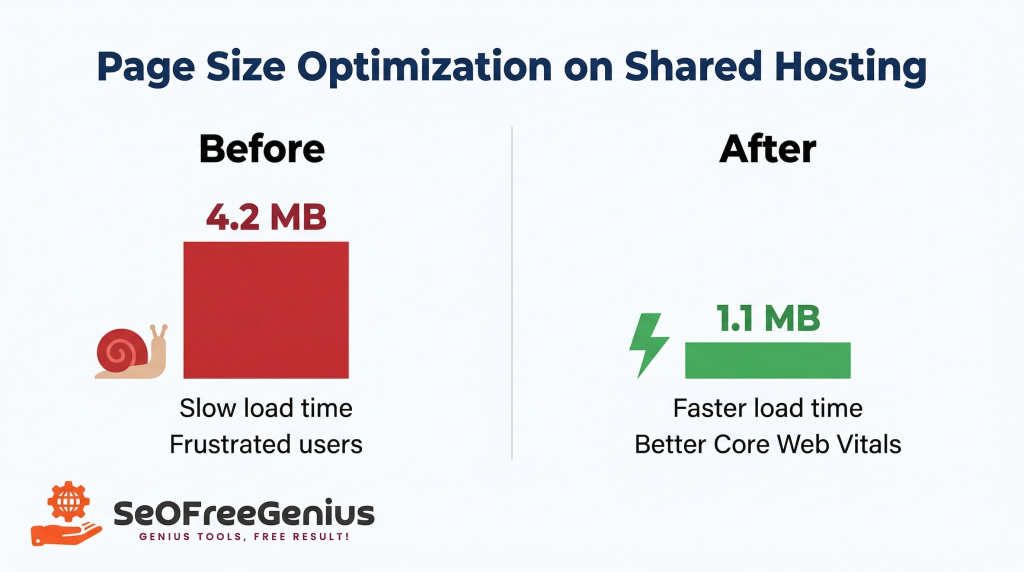
Consider this scenario: Your homepage loads 4 MB of images, 800 KB of JavaScript, and 300 KB of CSS. On a fast dedicated server with abundant bandwidth, users might not notice. But on shared hosting, where you’re competing for limited bandwidth and the server’s CPU has to compress and process all those assets, that 5+ MB page can take 5–8 seconds to load on a 3G mobile connection.
Google’s Core Web Vitals; specifically Largest Contentful Paint (LCP); directly measure how quickly the main content of your page loads. Google has confirmed that Core Web Vitals are ranking factors. Pages that load slowly score poorly on LCP, which can cost you rankings.
According to the SEO Free Genius technical SEO guide for shared hosting, many shared hosting sites can reduce page size by 50–90% through basic compression and image optimization, leading to dramatic speed improvements.
How to Check Your Page Size
Use the Page Size Checker on SEO Free Genius to get an instant breakdown:
- Go to the Page Size Checker at https://seofreegenius.com/page-size-checker
- Enter the URL of your homepage or a key content page
- Click Submit and review the total page size in MB or KB
Target benchmarks:
- Under 1 MB: Excellent for most content pages
- 1–2 MB: Acceptable if heavy on images (e.g., photography blog)
- 2–3 MB: Borderline; needs optimization
- Over 3 MB: Too heavy; urgent optimization required
The tool may also show a breakdown by resource type (HTML, images, scripts, stylesheets), helping you identify the biggest contributors to page weight.
Practical Ways to Reduce Page Size (No Developer Needed)
Here are the highest-impact optimizations you can implement today:
Optimize Images
Images typically account for 50–80% of total page weight. Before uploading images to your site:
- Compress images using free tools like TinyPNG, Squoosh, or the image optimizer built into WordPress plugins like Smush or ShortPixel
- Use appropriate file formats: JPEG for photos, PNG for graphics with transparency, WebP for modern browsers (many WordPress plugins auto-convert)
- Resize images to display dimensions: Don’t upload a 4000×3000px image if it only displays at 800×600px
Easy implementation: If you use WordPress, install a free image optimization plugin like Smush or EWWW Image Optimizer. These plugins automatically compress images on upload and can bulk-optimize your existing media library.
Enable GZIP Compression
GZIP compression shrinks your HTML, CSS, and JavaScript files by 70–90% before sending them to users’ browsers. This is one of the single highest-impact optimizations for shared hosting.
Most shared hosting control panels (cPanel, Plesk, DirectAdmin) allow you to enable GZIP compression with a checkbox. If not, you can add this code to your .htaccess file (located in your site’s root directory):
<IfModule mod_deflate.c>
AddOutputFilterByType DEFLATE text/html text/plain text/xml text/css text/javascript application/javascript application/json
</IfModule>
How to verify: After enabling GZIP, re-run the Page Size Checker to confirm your page size has dropped significantly.
Minify CSS and JavaScript
Minification removes unnecessary characters (spaces, line breaks, comments) from code files without changing functionality. This reduces file size by 10–30%.
If you use WordPress, plugins like Autoptimize or WP Rocket handle minification automatically. For other platforms, use free online minifiers or ask your hosting provider if they offer built-in optimization.
Lazy Load Images
Lazy loading delays loading images until users scroll near them, reducing initial page weight. Modern browsers support native lazy loading; simply add loading=”lazy” to your <img> tags.
Many WordPress themes and page builders now enable lazy loading by default. Check your theme settings or install a dedicated plugin like Lazy Load by WP Rocket. After implementing these optimizations, re-check your page size. You should see improvements of 40–70%, leading to faster load times and better Core Web Vitals scores.
Step 3: Fix Redirect Chains to Save Crawl Budget and Speed
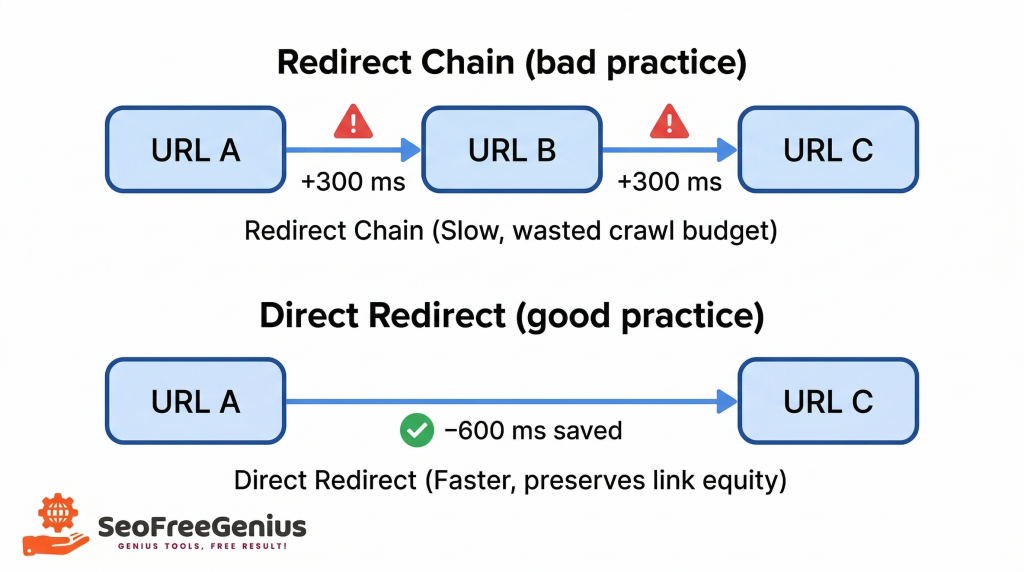
Redirect chains happen when URL A redirects to URL B, which redirects to URL C, which finally loads the actual content. Every redirect adds latency and wastes crawl budget; problems that are amplified on shared hosting.
Why Redirect Chains Hurt SEO on Shared Hosting
Each redirect requires the browser (or Googlebot) to:
- Request URL A
- Wait for the server to respond with a redirect instruction
- Request URL B
- Wait for another redirect response
- Finally request URL C and load the actual page
On shared hosting, where server response times are already slower due to resource sharing, each redirect can add 200–500ms to page load time. Three redirects in a chain can add 1–1.5 seconds of pure wasted time.
Additionally, redirect chains dilute “link equity” (ranking authority). According to research on redirect chains and SEO, each redirect in a chain causes roughly 15% loss in link equity, which compounds with multiple redirects.
For shared hosting sites with limited crawl budget, redirect chains are especially damaging because Google wastes time following redirects instead of discovering new content.
How to Find Redirect Chains
The easiest way to identify redirect chains is to:
- Audit your site’s key URLs (homepage, important category pages, top blog posts)
- Check each URL’s redirect path using a tool or browser extension
You can also use the Server Status Checker to quickly verify that important URLs return direct 200 status codes without redirects.
Common causes of redirect chains:
- Protocol changes (http → https), especially if implemented in stages
- URL structure migrations (e.g., added or removed “www”, changed permalinks)
- Plugin or theme updates that create new redirects on top of old ones
- Accumulated redirects from years of content updates without cleanup
How to Fix Redirect Chains
Once you’ve identified redirect chains, the fix is straightforward: implement direct 301 redirects from the original URL to the final destination, skipping all intermediate steps.
Use the Htaccess Redirect Generator on SEO Free Genius to create clean, direct redirects:
- Go to the Htaccess Redirect Generator at https://seofreegenius.com/htaccess-redirect-generator
- Enter the old URL (the original URL users or Google might encounter)
- Enter the new URL (the final destination where content actually lives)
- Select redirect type (301 for permanent moves)
- Copy the generated code and add it to your .htaccess file
Example scenario:
- Old chain: http://example.com/old-post → https://example.com/old-post → https://example.com/new-post
- Fix: Create one direct redirect from http://example.com/old-post → https://example.com/new-post
This eliminates two hops, saving 400–800ms in load time and preserving full link equity.
Best practices for redirects on shared hosting:
- One hop maximum: Always redirect directly to the final destination
- Avoid redirect loops: Never create circular redirects (A → B → A)
- Update internal links: After setting up redirects, update your site’s internal links to point directly to new URLs, eliminating even the single redirect for internal traffic
- Monitor redirect performance: Re-run the Server Status Checker monthly to catch new redirect chains early
The comprehensive guide to fixing broken links on SEO Free Genius provides additional details on implementing safe, effective redirects without breaking your site.
Step 4: Create Clean XML Sitemaps for Efficient Crawling
On shared hosting, where crawl budget is limited and server resources are constrained, making it easy for Google to discover and index your content is critical. XML sitemaps are your primary tool for guiding crawlers efficiently.
Why Sitemaps Matter More on Shared Hosting
An XML sitemap is essentially a roadmap of your site that tells search engines:
- Which pages exist on your site
- When each page was last updated
- How often pages typically change
- The relative priority of different pages
On premium hosting with fast servers and abundant crawl budget, Google can afford to spider your entire site frequently, even without a perfect sitemap. On shared hosting, where server response times are slower and crawl budget is tighter, a clean, well-structured sitemap becomes essential for ensuring Google finds and indexes your important pages quickly.
According to the SEO Free Genius guide on fixing indexing problems with XML sitemaps, proper sitemap implementation can improve index coverage by 20–40% on budget hosting environments.
How to Create a Clean XML Sitemap
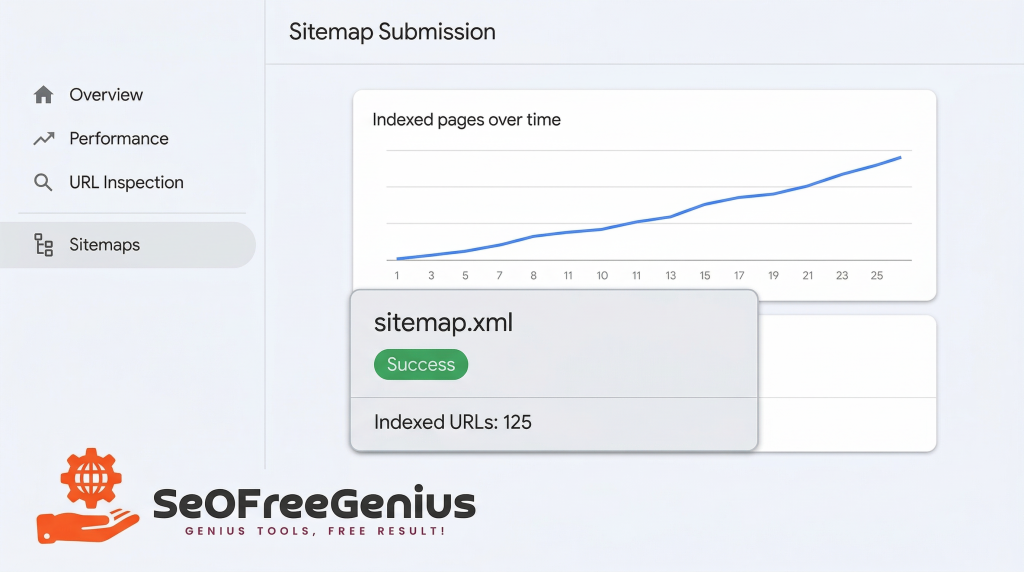
Use the XML Sitemap Generator on SEO Free Genius to create a properly formatted sitemap:
- Go to the XML Sitemap Generator at https://seofreegenius.com/xml-sitemap-generator
- Enter your domain (e.g., https://yourdomain.com)
- Click Generate and the tool will crawl your site and create an XML sitemap
- Download the generated sitemap file (sitemap.xml)
- Upload it to your site’s root directory (so it’s accessible at https://yourdomain.com/sitemap.xml)
What to Include (and Exclude) in Your Sitemap
Include:
- All important content pages (blog posts, product pages, service pages)
- Category and tag pages that have substantial unique content
- Recently updated pages (to prioritize fresh content in Google’s crawl queue)
Exclude:
- Duplicate content (pagination pages, print versions, AMP versions if canonical is set correctly)
- Admin pages, login pages, checkout pages
- Pages with noindex tags (no point telling Google to crawl pages you don’t want indexed)
- Very old, outdated content you plan to delete or consolidate
Submit Your Sitemap to Google Search Console
After uploading your sitemap:
- Log into Google Search Console
- Go to Sitemaps (in the left sidebar under “Index”)
- Enter your sitemap URL (sitemap.xml or the full path)
- Click Submit
Google will begin using your sitemap to discover pages. Check back in a few days to see how many URLs from your sitemap have been indexed.
Maintain Your Sitemap
As you add, update, or remove content:
- Regenerate your sitemap monthly using the XML Sitemap Generator
- Resubmit in Search Console or use the “ping” function to notify Google of updates
- Monitor the Sitemaps report in Search Console for errors (e.g., URLs returning 404 or URLs blocked by robots.txt)
The cleaner and more accurate your sitemap, the more efficiently Google can crawl your site—a crucial advantage on shared hosting where every crawl request counts.
Step 5: Monitor and Optimize Core Web Vitals
Google’s Core Web Vitals are a set of metrics that measure real user experience: how quickly content loads (LCP), how quickly the page becomes interactive (FID/INP), and how stable the layout is (CLS). These metrics are confirmed ranking factors.
On shared hosting, Core Web Vitals often suffer due to limited server resources. But with targeted optimizations, you can still achieve “Good” scores that match or beat sites on premium hosting.
The Three Core Web Vitals
- Largest Contentful Paint (LCP): Measures how long it takes for the main content (largest image or text block) to appear. Target: under 2.5 seconds.
- First Input Delay (FID) / Interaction to Next Paint (INP): Measures responsiveness when users click or tap. Target: under 100ms (FID) or 200ms (INP).
- Cumulative Layout Shift (CLS): Measures visual stability (how much content jumps around as the page loads). Target: under 0.1.
How to Check Your Core Web Vitals
Use the PageSpeed Insights Checker on SEO Free Genius to get Google’s official Core Web Vitals scores:
- Go to the PageSpeed Insights Checker at https://seofreegenius.com/pagespeed-insights-checker
- Enter your page URL
- Click Submit to run a full performance audit
The tool returns your Core Web Vitals scores for both mobile and desktop, along with specific recommendations for improvement.
Quick Wins for Core Web Vitals on Shared Hosting
To improve LCP (Largest Contentful Paint):
- Optimize your largest image (compress it, serve WebP format, use lazy loading for below-fold images)
- Enable browser caching so returning visitors load resources from cache instead of re-downloading
- Use a CDN (Content Delivery Network) like Cloudflare’s free plan to serve images and static assets faster
To improve FID/INP (Interactivity):
- Minimize JavaScript execution by deferring non-critical scripts
- Remove unused plugins (WordPress sites often accumulate plugins that add bloat)
- Upgrade to PHP 8+ in your hosting control panel for faster server-side processing
To improve CLS (Layout Stability):
- Set explicit width and height on all images and videos so browsers reserve space before content loads
- Avoid inserting ads or pop-ups that push content down after page load
- Load web fonts properly using font-display: swap to prevent invisible text flashes
The SEO Free Genius guide on maximizing site speed on shared hosting provides step-by-step instructions for implementing each of these optimizations.
After making changes, re-run the PageSpeed Insights Checker weekly to track improvements. Small gains in Core Web Vitals can translate to noticeable ranking improvements, especially in competitive niches.
Real-World Example: Budget Site Beating Premium Hosting
Let me share a concrete example of how these strategies work in practice.
The scenario:
A small food blog running on $6/month shared hosting was struggling to rank for competitive recipe keywords. Pages took 4–6 seconds to load, and Google Search Console showed declining impressions.
The fixes implemented (all using free tools):
- Ran Server Status Checker weekly and documented frequent 503 errors. Contacted hosting support, who moved the site to a less crowded server.
- Used Page Size Checker and discovered homepage was 5.2 MB. Compressed all images using TinyPNG, enabled GZIP compression, and reduced page size to 1.4 MB.
- Found and fixed redirect chains using Htaccess Redirect Generator, eliminating 3-hop redirects on 12 important recipe pages.
- Generated clean XML sitemap and submitted to Search Console, focusing only on recipe content and excluding tag pages with thin content.
- Monitored Core Web Vitals with PageSpeed Insights Checker and implemented image lazy loading, deferred JavaScript, and upgraded to PHP 8.
The results (after 6 weeks):
- LCP improved from 4.8s to 2.1s (now in “Good” range)
- Page load time dropped from 5.5s to 1.9s
- Organic traffic increased 43% as pages started ranking on page 1
- Bounce rate decreased from 68% to 51% as pages loaded faster
All of this was achieved on the same $6/month shared hosting, using free tools and basic optimizations anyone can implement.
Common Mistakes to Avoid on Shared Hosting
As you implement these technical SEO strategies, watch out for these common pitfalls:
1. Ignoring hosting quality
Not all shared hosting is created equal. If your provider is overselling servers and you’re seeing constant downtime or 503 errors despite optimization efforts, it may be time to switch providers. Look for hosts with:
- 99.9%+ uptime guarantees (and a track record of actually meeting them)
- NVMe SSD storage (much faster than old spinning hard drives)
- Free SSL certificates (essential for security and rankings)
- PHP 8+ support and modern server software
2. Over-relying on plugins
WordPress site owners often install dozens of plugins to fix every issue. Each plugin adds overhead—database queries, HTTP requests, JavaScript files. Aim for under 20 active plugins, and audit regularly to remove unused ones.
3. Neglecting mobile optimization
Google uses mobile-first indexing, meaning it primarily evaluates your site’s mobile version. Test your site on actual mobile devices or use Google’s Mobile-Friendly Test. On shared hosting, mobile optimization is even more critical because mobile networks add latency to already-slower server response times.
4. Forgetting to monitor after fixes
Technical SEO isn’t “set it and forget it.” Schedule monthly check-ins:
- Run Server Status Checker to catch uptime issues
- Run Page Size Checker on new content before publishing
- Review Search Console’s Core Web Vitals report
- Check for new redirect chains as you update content
5. Skipping robots.txt optimization Create a robots.txt file using the Robots.txt Generator on SEO Free Genius to block crawlers from admin areas, search result pages, and other non-essential sections. This conserves crawl budget for your important content. As explained in the technical SEO guide for shared hosting, shared hosting environments benefit significantly from crawl budget optimization.
Your Technical SEO Action Plan for Shared Hosting
Here’s your complete step-by-step action plan to optimize technical SEO on shared hosting:
Week 1: Audit and Monitor
- Run Server Status Checker on your 10 most important pages
- Document any 500/503 errors and contact hosting support if frequent
- Set up weekly monitoring (calendar reminder) to catch uptime issues early
Week 2: Reduce Page Weight
- Run Page Size Checker on homepage and 5 key content pages
- Compress all images using TinyPNG or WordPress plugin
- Enable GZIP compression in cPanel or via .htaccess
- Recheck page sizes to confirm 40–70% reduction
Week 3: Fix Redirects
- Audit top 20 pages for redirect chains
- Use Htaccess Redirect Generator to create direct redirects
- Update internal links to point to final destinations
- Verify with Server Status Checker that chains are eliminated
Week 4: Optimize Crawling
- Generate XML sitemap with XML Sitemap Generator
- Upload sitemap to site root directory
- Submit sitemap in Google Search Console
- Create robots.txt to block non-essential areas
Ongoing: Monitor Core Web Vitals
- Run PageSpeed Insights Checker monthly
- Implement top 3 recommendations each month
- Track improvements in Search Console’s Core Web Vitals report
- Celebrate wins as rankings improve!
By following this plan systematically, you’ll transform your shared hosting site from a technical SEO liability into a competitive asset; without spending a penny on premium hosting or expensive monitoring services.
Conclusion: Budget Hosting, Premium Results
Shared hosting doesn’t have to be a barrier to SEO success. While premium hosting offers more resources, the reality is that most ranking factors are determined by how you optimize your site, not how much you spend on servers.
By focusing on the technical SEO fundamentals that matter most on shared hosting; uptime monitoring with the Server Status Checker, page weight reduction using the Page Size Checker, redirect optimization via the Htaccess Redirect Generator, and efficient crawling through clean XML sitemaps; you can achieve Core Web Vitals scores and rankings that rival or beat sites on dedicated servers.
The key is working smarter, not spending more. Use free tools to automate monitoring and diagnosis. Make small, consistent improvements each week. And remember: Google doesn’t know (or care) how much you pay for hosting; it only cares about the user experience your site delivers.
Start with Step 1 today. Check your server status, identify any uptime issues, and fix them. Then move methodically through Steps 2–5, tracking your progress in a simple spreadsheet.
In 30–60 days, you’ll see measurable improvements in page speed, Core Web Vitals, and most importantly; organic traffic and rankings. You don’t need expensive hosting to win at SEO. You just need the right technical foundation, built with free tools and smart optimization. Your competitors on premium hosting won’t know what hit them.
Ready to get started? Here are the free tools mentioned in this guide:
- Server Status Checker – Monitor uptime and response codes
- Page Size Checker – Measure and reduce page weight
- Htaccess Redirect Generator – Fix redirect chains
- XML Sitemap Generator – Create clean sitemaps
- PageSpeed Insights Checker – Monitor Core Web Vitals
- Robots.txt Generator – Optimize crawl budget
All tools are 100% free and require no registration at seofreegenius.com.
Need more help? Check out these related guides:
- Maximize Site Speed on Shared Hosting
- Technical SEO on Shared Hosting
- How to Fix Indexing Problems Using XML Sitemaps
- Fix Broken Links Without Expensive Software
Samir H. M. — SEO Expert
5+ years building SEO tools. SEOFreeGenius creator—50+ sites to #1.
All Articles →
Samir H. M. is the creator of [seofreegenius.com], offering 66+ free SEO tools from Riyadh. He’s hands-on tested and built features like plagiarism checkers and backlink tools, plus 36 guides to help sites rank better. Practical, no-BS advice for real users.