
Published: March 14, 2026
Author: SEO Free Genius Team
Reading time: 8–10 minute
Introduction
There’s nothing quite like the excitement of launching a new website. You’ve spent weeks—maybe months—perfecting your design, crafting your content, and polishing every detail. You hit “publish,” and then… crickets. No traffic. No rankings. No visibility in Google.
Here’s the reality: launching a website is only half the battle. If you want search engines to find you, index you, and actually send visitors your way, you need to set up your SEO foundation from Day 1. The good news? Doing it right from the start is far easier (and less expensive) than trying to fix technical problems and missed opportunities months down the road.
This guide is your step-by-step blueprint for launching a new website the right way. Whether you’re a startup founder, blogger, or small business owner, you’ll learn exactly what to do—in what order—to go from “invisible” to “indexable” and start earning those first precious clicks.
Why SEO on Day 1 Matters
Many new website owners make the mistake of treating SEO as an afterthought. They build first, launch second, and only then start thinking about visibility. But search engines like Google need clear signals to understand what your site is about, whether it’s trustworthy, and why it deserves to rank.
When you establish these signals from the beginning—clean technical setup, optimized content, proper indexing—you give your site the best possible chance to gain traction quickly. According to recent data from industry leaders, websites that implement foundational SEO during launch see indexing up to 40% faster than those that try to retrofit optimization later. [Clickrank.ai]
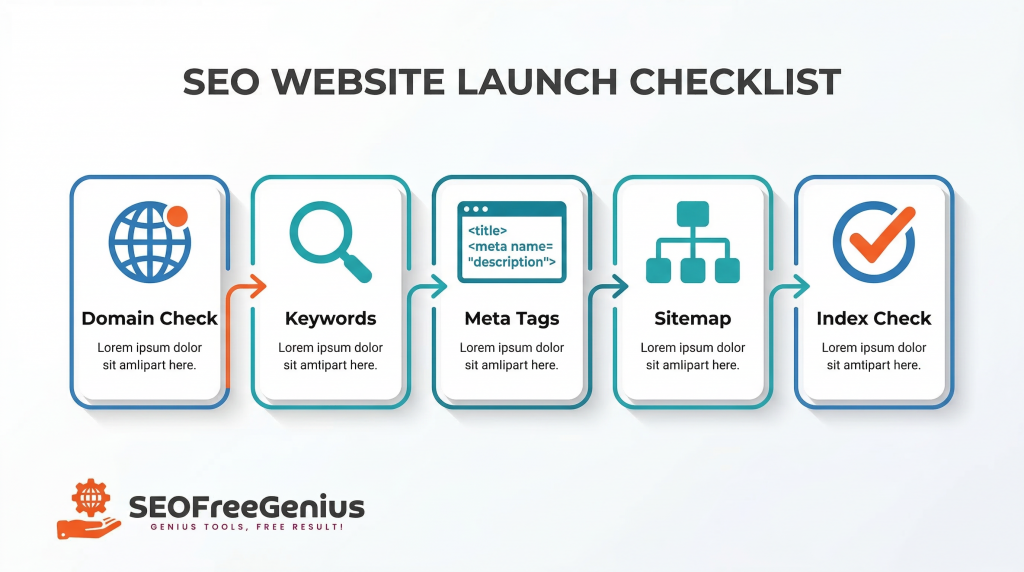
Let’s break down the exact checklist you need to follow.
Phase 1: Domain & Hosting Foundation
Why Your Domain History Matters (Even for New Sites)
Before you start optimizing content or submitting sitemaps, you need to understand your domain’s background. Even if you just registered a brand-new domain, it’s worth checking whether it was previously owned by someone else—and what they used it for.
Why does this matter?
Domain history can significantly impact your SEO performance. [DomRaider]
If your “new” domain was previously used for spammy practices, hosted low-quality content, or received Google penalties, you could inherit those problems. Search engines don’t completely reset a domain’s reputation when ownership changes. Past use influences how quickly your site gains trust, how smoothly it gets indexed, and whether it faces unexpected ranking delays.
On the flip side, if your domain has a clean history—or better yet, a strong backlink profile from quality use in the past—you might benefit from faster indexing and better initial credibility with search engines.
Action Step: Check Your Domain History
Use the Whois Checker to investigate your domain’s registration history, previous owners, and age. Look for:
- Previous registration dates and ownership changes
- Whether the domain has been abandoned and re-registered
- Any unusual patterns in ownership or nameserver changes
- Historical content (use archive.org‘s Wayback Machine alongside WHOIS data)
Red flags to watch for:
- Frequent ownership changes (instability signal)
- Previous use in unrelated or questionable niches (gambling, pharmaceuticals, adult content)
- Large gaps in registration (domain was let expire, then re-registered)
- Spammy backlink profiles pointing to old content
What to do if you find issues: If your domain has a problematic past, you have two options: work to rehabilitate it through high-quality content and disavowing toxic backlinks, or consider starting fresh with a genuinely clean domain. For most new site owners, a clean slate is worth the small cost of a new registration.
Phase 2: Research & Planning
The Importance of Targeting the Right Keywords from the Start
One of the biggest mistakes new website owners make is creating content first and thinking about keywords later. This approach is backwards. If you don’t know what your target audience is actually searching for, you’re essentially creating content in a vacuum—hoping it will somehow rank.
Effective SEO starts with keyword research. Before you write a single blog post or product description, you need to understand:
- What terms your target audience uses when searching
- How competitive those terms are
- What search intent lies behind each query
- Which keywords offer the best balance of traffic potential and achievability
Google’s algorithms in 2026 prioritize user intent and content quality more than ever before. [Siteground]. This means you can’t just stuff keywords into mediocre content and expect results. You need to match the right keywords to genuinely helpful, well-structured content that answers real questions.
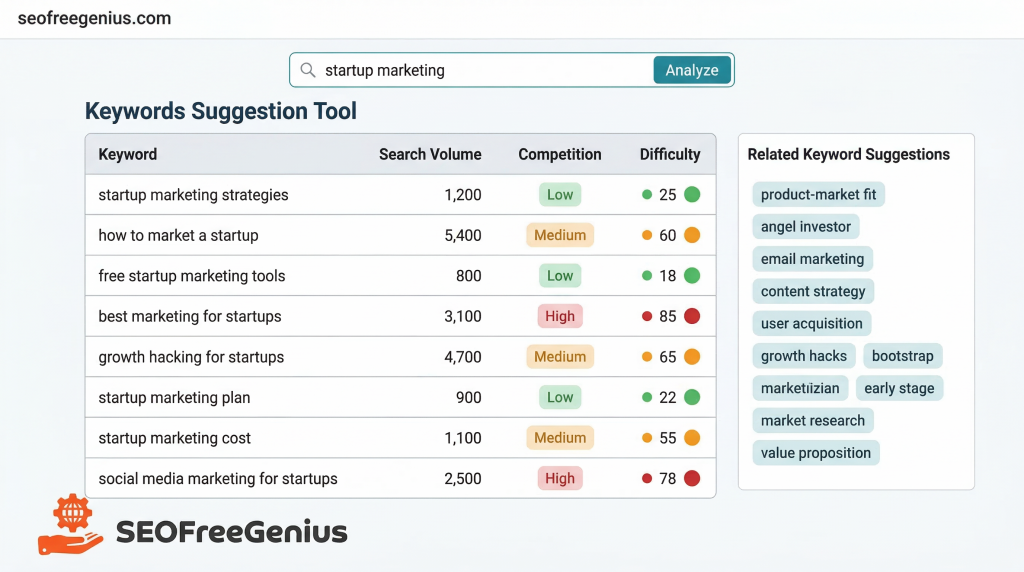
Action Step: Build Your Keyword Foundation
Use the Keywords Suggestion Tool to discover keyword opportunities for your niche. Start by entering your main topic or business category, then analyze the results for:
- Long-tail keywords (3-5 word phrases) with moderate search volume and lower competition
- Question-based keywords (“how to,” “what is,” “best way to”) that signal clear user intent
- Related terms and semantic variations you can use to build topic clusters
- Local modifiers if you’re targeting a specific geographic area
Pro tip: Don’t just chase high-volume keywords. For new websites, it’s smarter to target niche-specific long-tail keywords where you can actually compete and rank within your first few months. As your domain authority grows, you can gradually target more competitive terms.
Once you’ve identified your target keywords, create a simple spreadsheet mapping each keyword to a specific page on your site. This prevents keyword cannibalization (where multiple pages compete for the same term) and ensures every page has a clear optimization target.
Example mapping:
| Page | Primary Keyword | Secondary Keywords |
| Homepage | SEO tools free | free SEO checker, SEO analysis |
| Blog Post 1 | meta tags optimization | title tags, meta descriptions |
| Blog Post 2 | XML sitemap guide | create sitemap, sitemap generator |
Table 1: Keyword mapping example for content planning
Phase 3: On-Page Technical Setup
Why Meta Tags Are Your First Impression in Search Results
Think of meta tags as your website’s “storefront window” in Google search results. Your title tag and meta description are often the first (and sometimes only) thing potential visitors see before deciding whether to click through to your site.
These elements serve two critical functions:
- SEO Signal: They tell search engines what your page is about and help with relevance ranking
- Click-Through Rate (CTR) Optimization: They persuade searchers to choose your result over competitors
According to Google’s official SEO Starter Guide, well-crafted meta descriptions can significantly improve click-through rates, even if they don’t directly influence rankings. [Google Search Central]. And here’s the kicker: higher CTR can indirectly boost rankings because it signals to Google that users find your content valuable.
Best Practices for Meta Tags in 2026
Title Tags:
- Keep titles under 60 characters (to avoid truncation in search results)
- Include your primary keyword near the beginning
- Make it compelling—think “headline” not “label”
- Include your brand name at the end for consistency
- Avoid keyword stuffing or excessive punctuation
Meta Descriptions:
- Aim for 155-160 characters maximum
- Write a clear, benefit-driven summary of the page content
- Include a call-to-action when appropriate (“Learn more,” “Get started,” “Download free”)
- Use natural language—write for humans first, search engines second
- Include your target keyword if it flows naturally
Header Tags (H1-H6):
- Use one H1 per page, containing your primary keyword or close variation
- Structure content with H2s for main sections and H3s for subsections
- Make headers descriptive and useful for readers (avoid vague headings like “Introduction”)
- Use question-based H2s that match common search queries
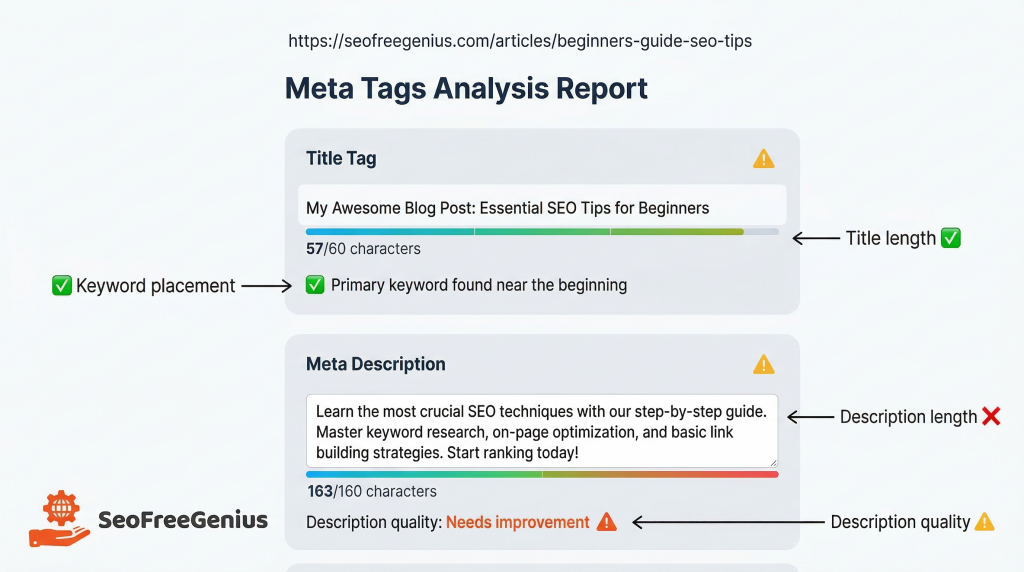
Action Step: Analyze and Optimize Your Meta Tags
Use the Meta Tags Analyzer to check every important page on your site. The tool will identify:
- Missing or duplicate title tags
- Meta descriptions that are too long or too short
- Opportunities to improve keyword placement
- Pages lacking proper H1 tags
Fix any issues before you start actively promoting your site or building backlinks. Clean, optimized meta tags ensure you make the strongest possible first impression when Google (and users) encounter your content.
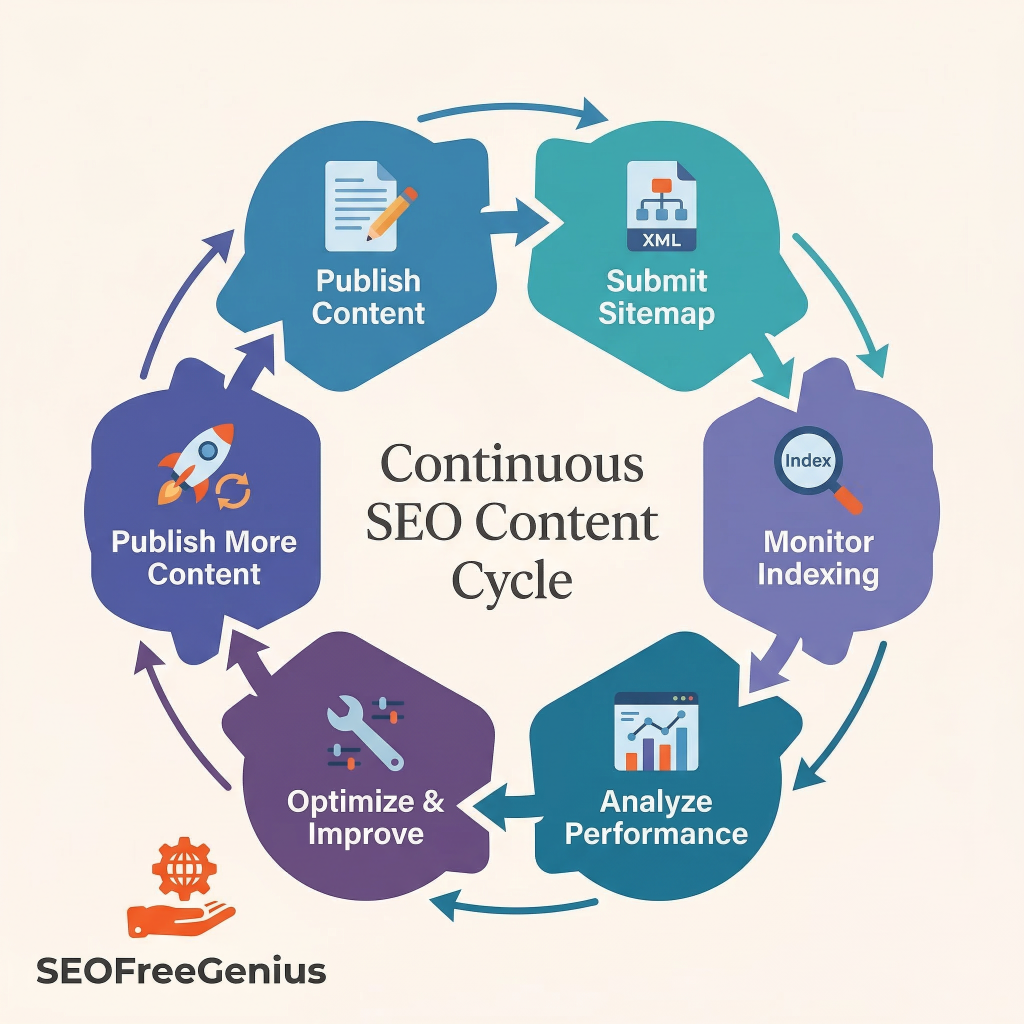
Phase 4: Sitemaps & Indexing
How to Help Google Discover Your New Site
Here’s a common misconception: “If I build a website, Google will automatically find it and add it to search results.” Unfortunately, that’s not quite how it works—especially for brand-new sites with no existing backlinks or authority.
Search engines discover new content through crawling—a process where bots follow links from one page to another across the web. But if no other websites link to yours yet (which is typical for new launches), Google has no path to find you. This is where sitemaps become essential.
An XML sitemap is essentially a roadmap of your website. It lists all your important pages, posts, images, and other content in a structured format that search engines can easily read. When you submit your sitemap to Google Search Console, you’re essentially saying, “Hey Google, here’s everything on my site—please crawl and index it.”
According to Google’s official documentation, sitemaps are particularly important for new websites, sites with large amounts of content, or sites with pages that aren’t well-linked internally. [Google Search Central].
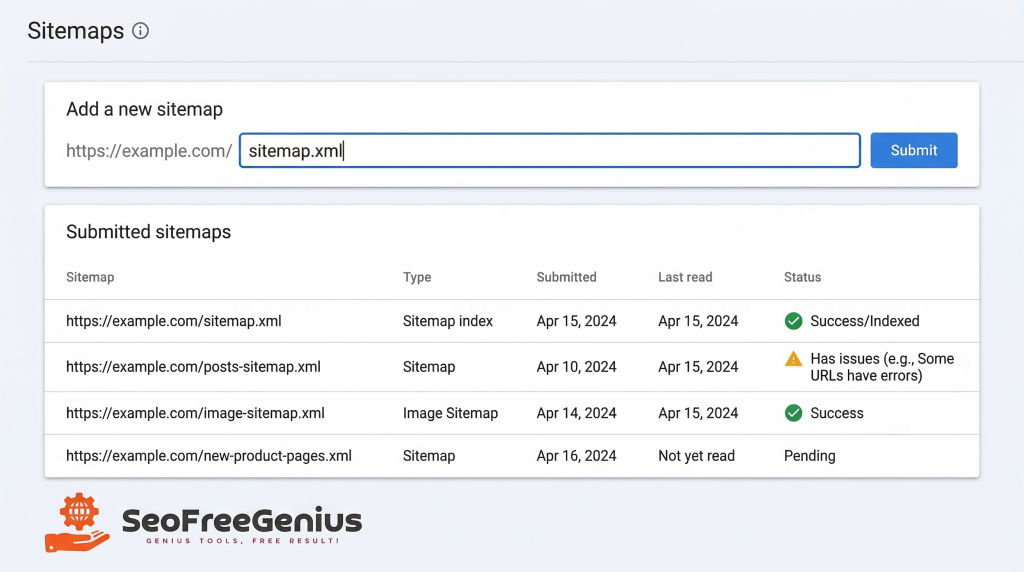
Action Step: Generate and Submit Your Sitemap
Step 1: Create Your Sitemap
Use the XML Sitemap Generator to automatically create a properly formatted sitemap file. The generator will:
- Crawl your entire website structure
- Identify all indexable pages (excluding admin pages, thank-you pages, etc.)
- Create a valid XML file following the sitemaps.org protocol
- Include priority levels and update frequency metadata
Step 2: Upload to Your Website
Once generated, upload the sitemap.xml file to your website’s root directory (e.g., https://yourwebsite.com/sitemap.xml). Most modern content management systems (WordPress, Shopify, Wix) either auto-generate sitemaps or have plugins that handle this automatically—but always verify the file is accessible by visiting the URL in your browser.
Step 3: Submit to Google Search Console
- Log in to Google Search Console (search.google.com/search-console)
- Select your verified property (your website)
- Navigate to “Sitemaps” in the left-hand menu
- Enter your sitemap URL (typically “sitemap.xml”)
- Click “Submit”
Google will begin crawling your sitemap within hours to days. You can monitor the status in Search Console to see how many pages were discovered and indexed.
Verify Your Pages Are Actually Indexed
Submitting a sitemap doesn’t guarantee indexing—it just makes your pages discoverable. Google still decides which pages to actually add to its index based on quality, relevance, and technical factors.
Action Step: Check Indexing Status
Use the Google Index Checker to verify which pages from your site have been successfully indexed. This tool quickly shows:
- Which URLs are indexed and searchable
- Which pages Google discovered but chose not to index (and why)
- Any crawl errors or indexing issues you need to fix
Common indexing issues for new sites:
- Blocked by robots.txt: Your robots.txt file is preventing Google from crawling important pages
- Noindex tag present: You accidentally left a “noindex” meta tag on pages you want indexed
- Duplicate content: Multiple pages with similar content confusing Google about which to index
- Low-quality content: Pages with thin, unhelpful content Google deems not worth indexing
- Crawl budget limitations: Very new sites may be crawled slowly until they prove value
If you discover indexing issues, address them immediately. For new websites, even small technical problems can delay your visibility by weeks or months.
Phase 5: Monitoring First Results
Track Your Initial Performance
Once your site is indexed and live, the real work begins: monitoring and improvement. SEO isn’t a “set it and forget it” activity—it’s an ongoing process of tracking performance, identifying problems, and optimizing based on data.
For a brand-new website, expect an initial “Google sandbox” period where rankings are lower than they’ll eventually be. This is normal. Google takes time to assess new sites, build trust signals, and understand your content’s quality and relevance. Most new sites see their first meaningful organic traffic within 3-6 months of consistent effort.
What to Monitor in Your First 90 Days
Week 1-2: Indexing and Crawl Status
- Check Google Search Console daily for indexing progress
- Monitor crawl stats to ensure Googlebot is accessing your site
- Fix any crawl errors or indexing warnings immediately
Week 3-8: Keyword Impressions
- Watch for your first keyword impressions (when your pages show in search results, even if not clicked)
- Track which pages are getting visibility first
- Identify opportunities to improve titles and descriptions for better CTR
Week 9-12: First Clicks and Traffic
- Celebrate your first organic clicks!
- Analyze which keywords and pages are driving traffic
- Double down on what’s working—create more content around successful topics
Essential Tools for New Site Monitoring
In addition to the free tools available at seofreegenius.com, make sure you have these essentials set up:
- Google Search Console — Track indexing, performance, and technical issues
- Google Analytics 4 — Understand user behavior, traffic sources, and conversions
- Page Speed Insights — Monitor Core Web Vitals and loading performance
Quick Wins to Boost Early Performance
While you’re waiting for organic momentum to build, implement these tactics for faster results:
- Internal linking: Connect your pages together with relevant anchor text to help Google understand your site structure and distribute authority
- Social signals: Share your content on social media platforms—Google often crawls these faster, helping with discovery
- Fix errors immediately: Don’t let 404s, broken links, or server errors accumulate—these harm user experience and SEO
- Update content regularly: Fresh content signals to Google that your site is active and maintained
- Earn your first backlink: Even one quality backlink from a relevant site can accelerate indexing and trust
Conclusion: Your Launch Checklist Summary
Launching a new website doesn’t have to be overwhelming. By following this systematic approach, you give your site the strongest possible foundation for SEO success.
Here’s your condensed launch checklist:
| Phase | Key Actions |
| 1. Domain Foundation | Verify domain history with Whois Checker |
| 2. Research | Find target keywords with Keywords Suggestion Tool |
| 3. Technical Setup | Optimize meta tags using Meta Tags Analyzer |
| 4. Sitemaps | Generate XML sitemap and submit to Google |
| 5. Indexing | Verify status with Google Index Checker |
| 6. Monitoring | Track weekly in Search Console and Analytics |
Table 2: Complete website launch SEO checklist
Remember these fundamental principles:
- Start with solid technical foundations before worrying about advanced tactics
- Target the right keywords from Day 1—don’t create content blindly
- Make your site easily crawlable and indexable—help Google help you
- Monitor consistently and fix issues as soon as they appear
- Be patient—SEO is a marathon, not a sprint
The first 90 days after launch are critical. The decisions you make now—choosing the right keywords, optimizing your technical setup, and ensuring proper indexing—will determine how quickly you gain traction and start earning organic traffic.
Don’t try to do everything at once. Follow this checklist systematically, use the free suite of SEO tools available at seofreegenius.com to verify your work, and you’ll be well on your way from “first crawl” to “first clicks”—and beyond.
Your website launch is just the beginning. With the right SEO foundation in place, you’re ready to grow.
Samir H. M. — SEO Expert
5+ years building SEO tools. SEOFreeGenius creator—50+ sites to #1.
All Articles →
Samir H. M. is the creator of [seofreegenius.com], offering 66+ free SEO tools from Riyadh. He’s hands-on tested and built features like plagiarism checkers and backlink tools, plus 36 guides to help sites rank better. Practical, no-BS advice for real users.